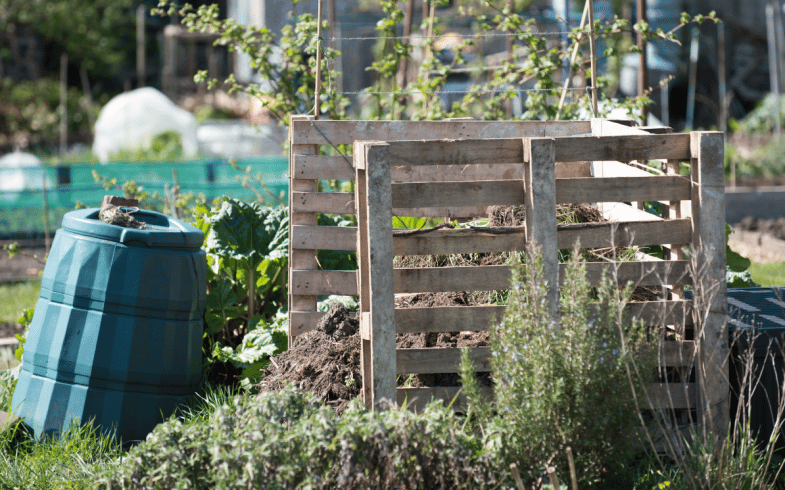
Building A Compost Bin For Free From Old Pallets
In this blog post, we talk about how you can easily create your own compost bin for practically nothing out of recycled materials, bar a few screws and nails, and a couple hours of your time!
Leading on from our previous blog post about the rewards of a compost heap, it’s useful to know that you don’t have to go out and buy a ready-made one, especially as they can be around £60 – £100 if ordering one online. Instead, if you have a spare couple of hours, and a vehicle (to transport the wood) then you can make your own wooden compost bin for free!
The main item that you’ll need to source are four second hand pallets. You can normally find these being offered for free at local businesses and shops, warehouses, your local garden centre, or simply look online on Facebook marketplace or similar to find a place offering them for free. These types of entities receive goods to their place of business on the pallets, but then are left to dispose of the empty pallet themselves, hence why they offer handing them out for free to anyone who can collect them.
What You’ll Need:
- 4 Second-Hand Wooden Pallets
- Hammer
- Nails
- Measuring Tape
- Wood Saw
- Safety Glasses
- Gloves
Building Your Compost Bin:
- Firstly, if you haven’t already, gather all of the materials together. The 4 second hand wooden pallets should be of similar size and shape, and make sure that they are in good condition.
- Cut the pallets to size. Use a wood saw to cut two of the pallets in half, creating four 24” x 40” pieces. Keep the other two pallets intact.
- Assemble the base. Lay two of the 24” x 40” pieces on the ground, parallel to each other, with their 40” sides facing up. Nail them together at the corners using a hammer and nails. Repeat this process to assemble the second half of the base.
- Create the walls. Stand up one of the intact pallets so that it is perpendicular to the base, and nail it to the base at the corners. Repeat this process with the second intact pallet, nailing it to the other side of the base. The base and walls should now form a box shape.
- Secure the walls. Nail the two remaining 24” x 40” pieces to the inside of the box walls, parallel to the base, creating a secure structure.
- Add a lid. Cut a piece of pallet or another piece of wood to fit the top of the compost bin, and nail it to the top of the box walls to create a lid.
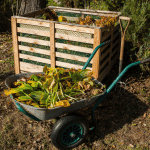
- Your compost bin is now ready to use! Fill it with compostable materials such as food scraps, leaves, grass clippings, and plant waste.
Placing Your Hand Made Compost Bin
When it’s time to choose a location for your compost bin, find a spot that is easily accessible and has good drainage. The area should also be in close proximity to your garden so you can easily add kitchen scraps and yard waste to the compost bin, but not too close that it may hinder your view when relaxing outside.
Tips On Maximising Your Composting Efforts
Aerate the compost: Turn the compost regularly with a garden fork to ensure that it is well aerated. This will help to speed up the composting process and prevent the pile from becoming smelly.
Keep it moist: Make sure the compost stays moist, but not waterlogged, by adding water as needed.
Monitor the temperature: The compost should be warm to the touch. If it’s too hot, add more brown materials like dead leaves. If it’s too cold, add more green materials like grass clippings.
Add compost activators: You can add compost activators like compost starter or worm castings to speed up the composting process.
Harvest the compost: When the compost is dark and crumbly, it’s ready to use in your garden. Simply remove it from the bin and use it to amend your soil or potting mix.
By following these steps, you will have a successful wooden compost bin that will provide nutrient-rich compost for your garden. Regular maintenance, including turning the compost and adding the right balance of materials, will keep it healthy and productive.

More Blogs You May Like To Read:

Greenhouse Brands
Yearly Growing Planner
Social
Follow us on Pinterest for our latest reviews, guides, blog posts and garden inspiration!
No comments.